Designing an L-shaped outdoor kitchen can be a fun and rewarding project that enhances your outdoor living space.
Here’s how you can approach the planning and design process:
Shortcut to article sections:
-
-
- 1. Determine the Location:
- 2. Define Your Needs and Wants: Cooking requirements, Storage and Prep Areas
- 3. Plan Your Budget:
- 4. Choose Materials: Countertops, Cabinetry, and Flooring
- 5. Utility Planning: Electricity, Water and Gas
- 6. Design Layout: The “L” shape, Work Triangle and Ventilation
- 7. Outdoor Kitchen Lighting: Task Lighting, Ambient Lighting, Safety Lighting
- 8. Outdoor Kitchen Permits and Regulations:
- 9. Construction: DIY or Professional, Foundation, and Utilities Installation
- 10. Lifestyle appliances and Finishing Touches:
- 11. Landscaping and Decor:
- 12. Maintenance Plan:
- 13. L-Shaped Outdoor Kitchen Examples:
-
Related article: Building your BBQ island: Comparing Wood, Steel, Aluminum and Stainless Steel Options
1. Determine the Location:
Space Assessment/ Space Requirements:
-
- Size: Determine the dimensions of your available space. An L-shaped kitchen can be adapted to various sizes, but you need a minimum amount of space to accommodate basic elements like grills, countertops, and seating.
- Shape: Since you’re interested in an L-shaped kitchen, ensure that the natural shape of your available space can accommodate such a design comfortably.
Layout and Functionality:
-
- Work Zones: Consider creating different zones for cooking, prep, and socializing. Ensure there’s enough room for each zone within the L-shaped layout.
- Traffic Flow: Think about how people will move around the space. There should be clear pathways that don’t interfere with the cooking area. Typically, you want at least 36 inches of clearance for walkways and more for areas where guests may gather.
- Accessibility: Check if the kitchen areas are easily accessible for carrying food and supplies from your indoor kitchen. If you’re entertaining, also think about how your guests will interact with the space.
- Proximity to the House: Consider how close you want the kitchen to your home for ease of access to utilities and indoor kitchen amenities.
Environmental Considerations:
-
- Wind Direction: Be aware of prevailing wind patterns to avoid smoke from the grill blowing into dining or seating areas.
- Sunlight: Consider the path of the sun throughout the day. You might want to position the seating area in a shaded spot or plan for a shade structure if the kitchen will receive a lot of direct sunlight.
Existing Features:
-
- Utilities: Identify where your existing utility lines are as this can affect where you place certain kitchen features. Extending gas, water, or electricity can be costly.
- Landscape Elements: Work with existing landscape features rather than against them. Mature trees or garden beds can enhance the ambiance but may also dictate the kitchen’s orientation.
Expansion and Flexibility:
-
- Modular Elements: If space is limited, consider modular outdoor kitchen units that can be rearranged as needed.
- Scalability: Design the space so that you can expand or adapt it in the future as your needs or budget change.
2. Define Your Needs and Wants: Cooking Requirements, Storage and Prep Areas
When considering the cooking requirements for your outdoor kitchen, it’s important to think about the types of food you like to prepare, how often you entertain, and what appliances might best serve those needs.
Here’s a more detailed look into various appliances and considerations:
Grill
-
- Type: Gas grills are popular for convenience, but charcoal grills provide that classic smoky flavor. Consider having both for versatility.
- Size: Determine the grill size based on how many people you typically cook for. More burners allow for greater flexibility.
- Features: Look for features like side burners, rotisserie attachments, infrared sear stations, and built-in thermometers.
Smoker
-
- Function: If you enjoy slow-cooked barbecue, a dedicated smoker can be a worthwhile investment.
- Type: Options include pellet smokers, offset smokers, kamado grills, and electric smokers, each offering different features and flavors.
- Capacity: Consider the size if you plan to smoke large cuts of meat or multiple items at once.
Pizza Oven
-
- Heat Source: Choose between wood-fired for authentic flavor or gas for convenience.
- Construction: Consider a pizza oven with high-quality insulation and durable materials for efficient heating and longevity.
- Space: Ensure you have enough space, as pizza ovens can be substantial in size.
Side Burners
-
- Utility: Side burners are perfect for sauces or sides and mean you don’t have to go back and forth to the indoor kitchen.
- Power: Look for burners with enough BTUs (British Thermal Units) to handle the type of cooking you do.
Refrigeration
-
- Outdoor Refrigerator: Essential for keeping ingredients and beverages chilled and close at hand. Make sure it’s rated for outdoor use.
- Wine Cooler: If you’re a wine enthusiast, an outdoor wine cooler can be a special addition.
- Ice Maker: For entertainers, an ice maker keeps drinks cool without the need for constant refilling from inside.
Sinks and Water Features
-
- Sink: A sink with both hot and cold water is highly convenient for prep and cleanup.
- Bar Tap: If you enjoy draft beer, an integrated kegerator with a tap can be a highlight.
Additional Appliances and Features
-
- Outdoor Dishwasher: For a fully functional kitchen, consider an outdoor-rated dishwasher.
- Warming Drawers: Great for keeping food warm until it’s time to eat, especially for staggered serving times.
- Storage Drawers: Refrigerated drawers can be used to keep food fresh until you’re ready to grill.
Customization and Special Features
-
- Built-In Systems: Integrated systems can be designed to blend seamlessly with your countertops and cabinetry.
- Portable Options: If flexibility is important, portable versions of outdoor kitchen appliances provide the ability to rearrange your setup.
Considerations
-
- Fuel Supply: Make sure you have the necessary gas lines or electrical outlets to power your appliances.
- Ventilation: Proper ventilation is crucial, especially for grills and pizza ovens. A vent hood may be necessary to manage smoke and fumes.
- Weatherproofing: Appliances must be weatherproof or have protective covers to safeguard against the elements.
- Utility Costs: Be mindful of the ongoing costs associated with running additional refrigeration or a high-powered grill
Storage and Prep areas:
Storage and prep areas are crucial elements of an outdoor kitchen as they contribute to the functionality and efficiency of your cooking space.
Here are key considerations for these areas:
Storage:
-
- Weather-Resistant Materials: Outdoor kitchen storage should be made from materials that can withstand temperature variations, moisture, and UV exposure. Stainless steel, marine-grade polymer, and teak are popular choices.
- Dry Storage: Have ample space to store dry goods, cooking utensils, and dining ware. Ensure that storage for dry goods is sealed to prevent moisture and pests from getting in.
- Cold Storage: If your budget allows, an outdoor-rated refrigerator or a cooler space for keeping drinks and perishables cold is very useful.
- Utility Storage: Space for storing cleaning supplies, trash bins, and recycling should be easily accessible but hidden from view.
- Protective Covers: For cabinets and appliances that might not be completely weatherproof, consider durable covers to protect them when not in use.
- Lockable Storage: Secure storage for valuable items or to ensure children cannot access dangerous tools or supplies.
- Vertical Storage: Utilize wall space for hanging utensils, towels, or even vertical shelving to maximize the available area.
Prep Areas:
-
- Durable Countertops: Like with storage, materials for outdoor countertops need to be weather-resistant. Granite, concrete, soapstone, tile, and stainless steel are top choices. They should also be easy to clean.
- Adequate Space: Ensure there is enough counter space for food preparation. An ideal setup would have prep space on either side of the grill or cooktop.
- Integrated Cutting Surfaces: Built-in cutting boards, preferably from materials such as hardwood or food-grade HDPE (high-density polyethylene), can make prep work more convenient.
- Drop-In Bins: Having bins that can be dropped into the countertop for waste or for holding ice and beverages is highly beneficial.
- Lighting: Good task lighting is essential for a prep area. Consider having overhead lighting or under-cabinet lights for visibility during evening cooking.
- Power Outlets: Having outdoor-rated electrical outlets within reach can be very handy for appliances like blenders or food processors.
- Sink and Water Access: A sink in the prep area makes it easier to wash hands, utensils, and food items. A hot and cold water supply is ideal.
- Bar or Serving Area: If space allows, an adjacent bar or raised serving area can allow guests to interact with the cook without getting in the way of meal prep.
- Accessibility: The prep area should be located near the cooking area for efficiency but with enough separation to maintain safety from hot surfaces.
3. How to Plan Your Budget:
Planning your budget for an outdoor kitchen involves several steps and considerations to ensure you achieve the balance between your dream kitchen and what’s financially feasible.
Here’s how to approach it:
Set a Clear Budget:
-
- Assess Finances: Determine how much you can realistically afford to spend without stretching your finances too thin.
- Reserve a Contingency: Set aside 10-20% of your budget for unexpected costs that arise during construction.
Prioritize Needs and Wants:
-
- Essentials First: Decide on the must-have features, like a quality grill or prep space.
- Luxuries Later: Identify items that are nice to have but not essential, like a pizza oven or wine cooler, which can be added later if the budget allows.
Research Costs:
-
- Appliances: Get a sense of how much the appliances you want cost. Outdoor-rated appliances are typically more expensive.
- Materials: Look into the price range of different materials for countertops, flooring, and cabinetry.
- Labor: If you’re not doing it yourself, get quotes from contractors to understand the labor costs.
Choose Where to Splurge and Save:
-
- Invest in Quality: Don’t skimp on the quality of appliances or foundational elements like electrical and plumbing work.
- Cost-effective Options: Choose less expensive materials for aspects like flooring or backsplashes that can still look great without breaking the bank.
Factor in Utilities and Services
-
- Gas, Water, Electricity: Consider the cost of extending gas lines, water pipes, or electrical wiring to your outdoor kitchen.
- Permits: Don’t forget to include the cost of permits and inspections, which vary by location.
Consider Phased Building
-
- Phase It Out: Plan your kitchen in phases, starting with the most essential elements. Save up for additional features and add them later.
- Prep for Additions: Even if you can’t afford everything now, prepare the infrastructure for easy additions in the future.
Do It Yourself vs. Professional
-
- DIY Savings: If you have the skills, doing some of the work yourself can save on labor costs.
- Expertise Matters: For aspects like gas or electrical work, hiring professionals is safer and may be required by code.
Look for Deals and Alternatives
-
- Sales and Discounts: Purchase appliances or materials on sale or look for last year’s models.
- Second-Hand: Consider quality second-hand appliances or repurposed materials.
Think Long-Term
-
- Maintenance Costs: Think about the long-term maintenance costs of your materials and appliances.
- Energy Efficiency: Investing in energy-efficient appliances can save money in the long run.
Review and Adjust
-
- Get Multiple Quotes: Always get several quotes for materials and work to ensure you’re getting the best deal.
- Revisit Your Plan: As you gather information, revisit and adjust your plan to stay within budget.
Formalize Your Plan
-
- Detailed Quote: Have a detailed quote that breaks down all expected costs before committing.
- Contracts: Ensure all work to be completed is outlined in contracts with any hired professionals.
By taking a methodical approach to budgeting, you can avoid overspending and ensure that your outdoor kitchen project is financially manageable. Always keep the big picture in mind, focusing on the return on investment both in terms of property value and the enjoyment you’ll get from the space.
4. Choose Materials: Countertops, Cabinetry, Flooring
When choosing materials for your outdoor kitchen components like countertops, cabinetry, and flooring, it’s critical to select materials that not only match your aesthetic preferences but also are durable and able to withstand the outdoor environment.
Here’s a more detailed look at each:
Countertops
Outdoor kitchen countertops need to be hardy, resistant to heat, UV rays, and able to cope with all weather conditions. Here are some popular options:
-
- Granite: It’s one of the most durable natural stones and can withstand the elements. Sealing granite can help prevent stains and weather damage.
- Quartzite: Not to be confused with quartz, quartzite is a hard natural stone that is more resistant to UV fading and can be sealed for outdoor use.
- Concrete: Highly durable and customizable in terms of shape and color. It needs to be sealed properly and resealed regularly.
- Soapstone: It’s a non-porous material, so it’s naturally resistant to stains and bacteria and doesn’t require sealing.
- Tile: Porcelain tiles are UV stable and frost proof, but grout lines can be a maintenance issue and the tiles can crack with direct impact.
- Stainless Steel: Offers a modern look, is easy to clean, and is incredibly heat resistant, but can scratch and show fingerprints.
Cabinetry
Outdoor kitchen cabinets should be weather-resistant and able to handle temperature fluctuations:
-
- Stainless Steel: Provides a modern look, is very durable, and resistant to the elements.
- Marine-Grade Polymer: This material is designed to resist water, UV rays, and other weather-related issues. It’s easy to clean and doesn’t require much maintenance.
- Teak and Other Hardwoods: When properly sealed and maintained, woods like teak can last for many years outdoors. They will, however, require regular treatment to maintain their resistance to the elements.
- Powder-Coated Aluminum: Rust-resistant and can be finished in a variety of colors, powder-coated aluminum is a lighter-weight option for cabinetry.
Flooring
The flooring should be slip-resistant, durable, and able to handle the weight of your appliances and foot traffic:
-
- Concrete: Either poured or as pavers, concrete is highly durable and versatile in finish options, but it can be hard underfoot and require resealing.
- Natural Stone: Like flagstone, slate, or travertine provides a beautiful and unique look but can be expensive and require regular sealing.
- Ceramic/Porcelain Tiles: They are available in many styles and are durable, but as with countertops, grout lines can require maintenance and tiles can be slippery when wet.
- Brick Pavers: They offer a traditional look, are relatively slip-resistant, and are durable, but they can become uneven and require periodic sealing.
- Composite Decking: Made from wood fibers and plastic, composite decking is durable, looks like wood, and is low maintenance.
In all cases, for materials used outdoors, especially in kitchens where stains and spills are common, it’s important to consider how easy the materials are to clean, their need for ongoing maintenance, and their long-term durability in the face of the specific conditions in your environment (such as extreme heat, frost, or coastal salt air). Always check with the manufacturer or supplier to ensure the suitability of a material for outdoor use in your area.
5. Utility Planning: Electricity, Water, and Gas
When you’re setting up an outdoor kitchen, utility planning is a critical step to ensure all your kitchen features function properly and safely. You need to plan for electricity, water, and gas, which involves careful consideration of how you’ll lay out these utilities, how they’ll connect to your home’s existing systems, and how they comply with local building codes.
Electricity
Planning Considerations:
-
- Outlet Placement: Ensure you have enough outlets for all your electrical appliances and that they are conveniently located.
- Circuit Requirements: Your outdoor kitchen may require its own dedicated circuit. High-power appliances like refrigerators need to be on separate circuits to prevent overloading.
- Lighting: Consider task lighting for cooking areas, ambient lighting for dining and social areas, and accent lighting for aesthetics.
- Safety: Use ground fault circuit interrupter (GFCI) outlets for safety to protect against electric shock, particularly in wet areas.
Professional Advice: Consult with a licensed electrician to determine your power needs. They can help plan the layout and ensure that the electrical work is up to code and safely integrated with your home’s electrical system.
Water
Planning Considerations:
-
- Sink Installation: A sink will require both a water supply and drainage. Think about whether you’ll need hot water, which will necessitate additional plumbing.
- Outdoor Faucet: An additional faucet can be useful for filling pots or hosing down the area.
- Drainage: Proper drainage is essential to prevent water accumulation and potential damage or safety hazards.
Professional Advice: Hire a plumber to map out the water lines and ensure they are properly installed and insulated against freezing temperatures if you live in a colder climate.
Gas
Planning Considerations:
-
- Grill and Cooktops: If you’re planning to have a gas grill or cooktop, you’ll need to run a gas line.
- Fixed or Portable: Decide if you want a fixed gas supply line installed or if you would prefer to use portable propane tanks that can be replaced.
Professional Advice: Gas work should always be done by a professional due to the risks involved. They can ensure that the gas line is properly sized for your appliances and that everything is installed safely.
Additional Tips
-
- Compliance: Check local codes and regulations regarding outdoor utility installation. You may need permits before starting any work.
- Safety First: All utilities must be safely installed away from heat sources and protected from the elements.
- Accessibility: Consider how easily you can shut off these utilities in case of an emergency.
- Future Proofing: Plan for any future expansions or additions to your outdoor kitchen by installing extra connections or conduits.
- Inspection: Have all installations inspected by the relevant professionals to ensure they are up to standard.
By thoughtfully planning for electricity, water, and gas, you’ll be ensuring that your outdoor kitchen is not only convenient and fully functional but also safe for you, your family, and your guests.
[/et_pb_text][et_pb_text module_id=”Design_Layout” _builder_version=”4.23″ _module_preset=”default” global_colors_info=”{}”]
6. Design Layout: The “L” shape, Work Triangle and Ventilation
When considering an L-shaped outdoor kitchen, the work triangle, and ventilation, here’s how to approach it:
Design Layout: The “L” Shape
-
- The “L” Shape: Sketch out the design, considering that one side typically houses the cooking appliances while the other may be for prep and sink.
- Versatility: The L-shape is conducive to most outdoor spaces, fitting neatly into corners and allowing for an open area to interact with guests.
- Zoning: This layout naturally divides your kitchen into distinct zones for cooking, prepping, and possibly even a bar or dining area.
Work Triangle
The work triangle is a principle from interior design that aims to create an efficient kitchen space, and it applies equally to outdoor kitchens. It involves three key points: the refrigerator (cold storage), the sink (cleaning/prep), and the stove/grill (cooking).
-
- Efficiency: Each ‘leg’ of the triangle should be neither too long nor too short (typically between 4 to 9 feet) to ensure efficient movement between each point.
- Minimize Traffic: The triangle should not be impeded by traffic or seating areas, allowing the cook to move freely.
- Adjustments: In an outdoor setting, you may need to adapt the traditional work triangle to accommodate fixed structures or the outdoor elements.
Ventilation
Importance:
-
- Safety: Proper ventilation is essential, especially for gas-fueled cooking appliances, to prevent the buildup of harmful fumes.
- Comfort: Good airflow keeps the cooking area comfortable by reducing smoke, heat, and odors.
- Protecting Structures: Ventilation prevents damage to nearby structures and items from smoke staining and heat.
Strategies:
-
- Hood Vent: If your design includes a pergola or roof structure, consider a hood vent over your grill.
- Natural Airflow: Position the cooking area to take advantage of prevailing winds, if possible, without blowing smoke into dining or seating areas.
- Vent Panels: Include vent panels in the construction of your cabinetry, especially if you are using a built-in grill.
General Tips
-
- Accessibility: Ensure that the primary chef has easy access to everything they need without having to cross the social or dining areas constantly.
- Storage Solutions: Incorporate storage solutions within your L-shaped design that keep cooking utensils, spices, and other necessities within arm’s reach of the cooking zone.
- Seating: If space allows, integrate a bar-height seating area on the outer side of one leg of the L for social interaction without crowding the cook.
Combining the L-shaped layout with a well-considered work triangle and adequate ventilation will not only maximize the functionality of your outdoor kitchen but will also enhance the overall experience for both the cook and guests
7. Outdoor Lighting: Task Lighting, Ambient Lighting, Safety Lighting
Lighting is a key component of any outdoor kitchen, serving both functional and aesthetic purposes. A well-lit outdoor kitchen should include task lighting, ambient lighting, and safety lighting to create an inviting and efficient space. Here’s a breakdown of each type:
Task Lighting
Task lighting is focused, brighter light that is designed to illuminate specific work areas where precision tasks, like chopping vegetables or reading recipes, are performed.
Key Points:
-
- Placement: Directly above grills, cooktops, and prep areas to ensure clear visibility for cooking and food preparation.
- Fixtures: Under-cabinet lights, pendant lights, or track lighting that can be directed onto countertops and cooking surfaces.
- Brightness: Choose bulbs that are bright enough to illuminate the work surface without causing glare.
Ambient Lighting
Ambient lighting provides a soft glow that allows for general visibility and helps to create the overall mood or atmosphere of the outdoor kitchen area.
Key Points:
-
- Diffuse Light: Wall-mounted fixtures, post lights, or even string lights that cast a gentle, even light across the entire space.
- Control: Dimmers can be very useful on ambient lighting to adjust the light levels depending on the time of day or the mood you want to set.
- Color Temperature: Warmer color temperatures (around 2700K-3000K) are often more inviting, mimicking the warmth of indoor lighting.
Safety Lighting
Safety lighting is essential to prevent accidents by illuminating pathways, steps, and changes in elevation.
Key Points:
-
- Strategic Placement: Install lights along walkways leading to the outdoor kitchen, on steps, and around the perimeter of the kitchen area.
- Subtle but Effective: Low-voltage landscape lighting or solar-powered stakes can provide enough light to guide the way without being overly bright.
- Non-Intrusive: Safety lights should not be blinding but should be clear enough to mark out any obstacles to avoid tripping hazards.
Considerations for All Lighting Types
-
- Weather-Resistant Fixtures: Ensure all lighting fixtures are rated for outdoor use, capable of withstanding the elements without rusting or degrading.
- Energy Efficiency: LED lights are ideal for outdoor kitchens as they consume less energy and have a longer lifespan compared to traditional bulbs.
- Integration with Design: Select fixtures that complement the design style of your outdoor kitchen and the overall landscape.
- Smart Controls: Consider incorporating smart outdoor lighting systems that can be controlled via smartphone or voice-activated devices. This can allow for easy adjustments and the ability to turn off all lights when the evening is over, even from indoors.
By combining task, ambient, and safety lighting, you can create an outdoor kitchen that is functional, safe, and welcoming, enhancing the usability of the space after dark and contributing to the ambiance of outdoor gatherings.
8. Outdoor Kitchen Permits and Regulations:
Navigating permits and regulations is an essential step in the process of creating an outdoor kitchen. These legal requirements are in place to ensure safety and compliance with local building and zoning codes. Here’s what you typically need to consider:
Building Permits
Building permits are often required for any new construction or significant alterations to existing structures. This includes:
-
- Structural Changes: Adding a roof, pergola, or any other structure to your outdoor kitchen.
- Electrical Work: Installing new electrical circuits or altering existing ones.
- Plumbing Work: Adding a sink, which involves running water lines and ensuring proper drainage.
- Gas Lines: If you’re installing a gas grill or stove, running new gas lines will typically require a permit.
Zoning Regulations
Zoning laws govern how a piece of land can be used. Regarding outdoor kitchens, you need to be aware of:
-
- Setbacks: These regulations dictate how close to your property line you can build.
- Height Restrictions: There may be limits on how tall structures like a grill hood or pavilion can be.
- Land Use: Some zones may have restrictions on the type of structures allowed, which could affect your outdoor kitchen.
Health and Safety Codes
These codes ensure that the design and installation of your outdoor kitchen are safe for use and adhere to sanitary standards. They may cover:
-
- Food Preparation Areas: Materials used must be easy to clean and capable of handling food safely.
- Ventilation: Adequate ventilation for grills and outdoor cooking appliances to prevent fire hazards and excessive smoke.
- Fire Safety: Regulations about the proximity of grills and open flames to other structures.
HOA Rules and CCRs
If you live in a community with a Homeowners Association (HOA) or are subject to Covenants, Conditions, and Restrictions (CCRs), there may be additional rules to follow, such as:
-
- Aesthetics: The outdoor kitchen must match the overall look of the community or your home’s exterior.
- Noise Restrictions: There could be limitations on when you can use certain noisy appliances if they disturb neighbors.
- Approval Processes: You may need to get your outdoor kitchen plans approved by the HOA board.
How to Ensure Compliance
-
- Research: Start by visiting your local municipality’s building department website or office to understand what permits and regulations apply to your project.
- Consult Professionals: Engage with contractors or architects who are familiar with local codes to help navigate the permit process.
- Plan Review: Have your plans reviewed by the relevant authorities before you start building.
- Inspections: After your outdoor kitchen is built, you will likely need to have it inspected by a city or county official to ensure it meets all code requirements.
Key Takeaways
-
- Begin Early: Start the permit process well in advance of when you hope to begin construction.
- Be Thorough: Provide detailed plans and documentation to avoid delays.
- Understand Costs: Permits and inspections will have fees associated with them, which should be factored into your budget.
- Stay Informed: Regulations can change, so make sure you have the most current information.
- Documentation: Keep copies of all your permits and approval letters as part of your home’s records.
Neglecting to obtain the proper permits can result in fines, legal action, and the requirement to dismantle non-compliant structures, so it’s important to adhere strictly to all regulations.
9. Construction: DIY or Professional, Foundation, and Utilities Installation
When building an outdoor kitchen, one of the first decisions to make is whether to take a DIY approach or hire professionals. The scope of your project, your skills, your budget, and the complexity of your design will influence this decision. Following that, you must consider the foundation and the installation of utilities, which are crucial steps in the construction process.
DIY or Professional
DIY Approach:
-
- Pros: Potentially lower costs, personal satisfaction from completing the project, flexibility to work at your own pace.
- Cons: Time-consuming, risk of mistakes, may be more expensive in the long run if errors occur, limitations on technical skills for utilities and custom work.
Professional Hire:
-
- Pros: Expertise and experience, faster completion, typically offer warranties, can handle permits and inspections, less effort required from you.
- Cons: More expensive upfront, finding the right contractor can be challenging, you have less control over the timing of the project.
Considerations:
-
- Skill Level: Assess your own skills realistically; masonry, carpentry, electrical, and plumbing work require expertise.
- Project Scale: Large or complex projects with custom features often warrant professional help.
- Budget: Professionals will cost more upfront, but they can prevent costly mistakes that might arise from a DIY approach.
Foundation
Importance: The foundation supports the weight of the outdoor kitchen and must be level and stable to prevent shifting or settling.
Options:
-
- Concrete Slab: Most common and durable option, providing a solid, level base.
- Pavers: Can be placed over a bed of sand or crushed stone; they offer aesthetic appeal and may be a DIY-friendly option.
- Decking: If building on an existing deck, ensure it can support the additional weight.
Preparation:
-
- Groundwork: The site must be cleared and leveled. For concrete slabs, forms need to be set up before pouring concrete.
- Drainage: Ensure proper drainage away from the kitchen area to prevent water accumulation.
Utility Installation
Electricity:
-
- Usage: Needed for lighting, appliances, and potentially entertainment systems.
- Safety: Must be installed to code, typically requiring GFCI (ground-fault circuit interrupter) outlets for outdoor use.
Plumbing:
-
- Water Supply: For sinks and refrigerators with ice makers or water dispensers.
- Drainage: Properly connect to your home’s waste system or an outdoor drainage system.
Gas:
-
- Natural Gas Lines: Permanent and convenient for grills and stoves; require a professional for safe installation.
- Propane: If you opt for propane, ensure you have a secure and accessible spot for the tank.
Ventilation:
-
- A good ventilation system, particularly for enclosed or semi-enclosed outdoor kitchens, is crucial for safety and comfort.
Preparation:
-
- Trenching: May be necessary to run gas, water, or electrical lines underground.
- Inspections: Utilities installations will likely need to be inspected and approved.
Construction Steps Overview
-
- Design: Complete a detailed design of your outdoor kitchen.
- Permits: Obtain necessary permits from your local government.
- Foundation: Prepare the site and lay the foundation.
- Utilities: Rough in the plumbing, gas, and electrical lines.
- Structural Elements: Build the framework for countertops, bars, and any overhead structures.
- Surfaces: Install countertops and flooring.
- Appliances and Fixtures: Install grills, sinks, refrigerators, and other appliances.
- Finishing Touches: Add lighting, backsplashes, and decorative elements.
Final Thoughts
The decision between DIY and hiring a professional, as well as the planning for the foundation and utilities installation, will set the stage for the entire project. Careful planning, budgeting, and adherence to local codes are essential to ensure the successful completion of your outdoor kitchen. Regardless of the path you choose, it’s crucial to be well-informed and prepared for the challenges that come with constructing an outdoor kitchen.
[/et_pb_text][et_pb_text module_id=”Electronics” _builder_version=”4.23″ _module_preset=”default” global_colors_info=”{}”]
10. Electronics and Finishing Touches:
When finalizing your outdoor kitchen, electronics, and finishing touches can significantly elevate the convenience, functionality, and ambiance of your space. Here’s how to approach these details:
Outdoor Kitchen Electronics
1. Audiovisual Equipment:
-
- Weatherproof Televisions: Ideal for those who want to watch sports or enjoy movie nights under the stars. Ensure they are designed for outdoor use.
- Sound Systems: Install weather-resistant speakers that can be discreetly placed around the outdoor kitchen and dining areas. Options include wired systems or wireless Bluetooth speakers that blend into the landscaping.
- Wi-Fi Extenders: To ensure a strong internet connection outdoors, consider installing Wi-Fi extenders or an outdoor router.
2. Refrigeration and Cooking Appliances:
-
- Refrigerators: A necessity for keeping food and drinks cold. Choose an outdoor-rated unit that can withstand temperature fluctuations and humidity.
- Wine Coolers: For wine enthusiasts, an outdoor wine cooler can be a sophisticated addition.
- Ice Makers: Freestanding or built-in ice makers are convenient for entertaining.
- High-Tech Grills: Modern grills come with numerous electronic options, such as LED lighting for the controls, digital thermometers, and even Bluetooth connectivity to monitor cooking temperatures remotely.
3. Lighting Control Systems:
-
- Smart Lighting: LED systems that can change color and intensity can create the perfect mood and are often controllable via smartphone apps.
- Timers and Sensors: Install timers or motion sensors to automate lighting, saving energy and providing convenience.
4. Charging Stations:
-
- Outdoor Outlets: Equip your kitchen with waterproof outdoor outlets to charge devices or plug in appliances.
- USB Ports: Consider having USB ports for a convenient phone or tablet charging.
Finishing Touches
1. Decorative Accents:
-
- Artwork: Weatherproof wall art or sculptures can reflect your personal style.
- Tableware: Invest in durable and stylish outdoor tableware, including plates, glasses, and utensils, that can withstand the elements.
- Planters: Add greenery with decorative planters that complement the outdoor kitchen’s design.
2. Comfort Additions:
-
- Heaters: For cooler climates, installing overhead heaters or adding portable fire pits can extend the usability of your outdoor kitchen into the cooler months.
- Fans or Cooling Systems: In warmer climates, ceiling fans or misting systems can make the outdoor kitchen more comfortable during hot weather.
3. Textiles and Fabrics:
-
- Cushions and Pillows: Add comfort and color with outdoor-rated cushions and pillows.
- Outdoor Rugs: Define dining or lounging areas with outdoor rugs that are mold-resistant and easy to clean.
4. Functional Aesthetics:
-
- Cabinet Hardware: Select durable and stylish handles and knobs that can withstand the outdoor environment.
- Backsplash: A creative backsplash can serve as a focal point and make cleaning easier.
As you plan and select electronics and finishing touches for your outdoor kitchen, remember to prioritize items that are designed for outdoor use to ensure longevity and safety. These elements not only complete the look of your outdoor kitchen but also enhance the experience, making your outdoor cooking and dining space an oasis of comfort and style.
11. Landscaping and Decor:
The landscaping and decor around an outdoor kitchen can significantly enhance its beauty and functionality, creating a seamless transition from home to garden and providing an inviting atmosphere for cooking and entertaining. Here are some key points to consider:
Landscaping Considerations:
1. Privacy and Screening:
-
- Use plantings like hedges, bamboo, or trellises with climbing vines to create a natural screen for privacy.
- Consider the maturity size of plants to ensure they don’t encroach on the kitchen space over time.
2. Thematic Gardens:
-
- Install a herb garden nearby for fresh ingredients at your fingertips.
- Consider a theme for your garden that complements the style of your outdoor kitchen, such as a Mediterranean or tropical garden.
3. Functional Plants:
-
- Choose plants that can repel insects naturally, such as lemongrass, lavender, and marigolds, to enhance the comfort of your outdoor space.
- Incorporate plants that can provide shade during the hottest parts of the day.
4. Lighting:
-
- Landscape lighting can accentuate garden features, provide pathway illumination, and enhance the overall ambiance.
- Solar-powered lights can offer an energy-efficient solution to illuminate the garden area.
5. Irrigation:
-
- Consider installing an irrigation system to keep the garden lush with minimal effort.
- Drip irrigation or soaker hoses can be an efficient way to water plants near the kitchen area without excess moisture where it isn’t wanted.
Decor Elements:
1. Outdoor Furniture:
-
- Choose furniture that complements the aesthetic of your outdoor kitchen and provides comfortable seating for dining and relaxation.
- Ensure that the materials used for outdoor furniture are durable and weather-resistant, such as teak, metal, or high-quality synthetic weaves.
2. Textiles:
-
- Add color and comfort with outdoor rugs, cushions, and throw pillows, making sure they are made from weather-resistant fabrics.
- Consider retractable awnings or umbrellas for adjustable shade and protection from the elements.
3. Art and Accessories:
-
- Introduce outdoor art pieces, such as sculptures or wall hangings, to add a personal touch.
- Use decorative items like candles, lanterns, or pottery to accessorize tabletops and counters.
4. Color Scheme:
-
- Coordinate the color palette of your outdoor kitchen with the surrounding landscape for a cohesive look.
- Use planters and decor items to introduce accent colors that can be changed seasonally.
5. Water Features:
-
- Incorporate a water feature, like a fountain or a small pond, to add a sense of tranquility and help mask ambient noise.
6. Entertainment:
-
- Install an outdoor sound system to play music without disturbing the natural sounds of the garden.
- Consider a weatherproof television or projector screen for outdoor movie nights or to catch a game while barbecuing.
Integration with the Outdoor Kitchen:
1. Cohesion:
-
- The style of the outdoor kitchen should be an extension of your home’s architecture and the garden’s design to create a unified space.
2. Transition Zones:
-
- Use paving materials that blend the indoor and outdoor spaces, perhaps extending the same stone or tile from inside your home to the outside.
- Create a smooth transition with steps, ramps, or an open walkway to encourage movement between the outdoor kitchen and the rest of the garden.
3. Nature’s Kitchen:
-
- Integrate natural elements such as wood, stone, and metal in the construction and decor of the outdoor kitchen to harmonize with the surrounding landscape.
By considering both landscaping and decor in the planning of your outdoor kitchen, you can create a space that is not only beautiful and comfortable but also reflective of your personal style and the natural setting. This integration enhances the overall experience, making the outdoor kitchen a central hub for gathering, dining, and enjoying the outdoors.
12. Outdoor Kitchen Maintenance Plan:
Creating a maintenance plan for an outdoor kitchen is critical to ensure it remains in good condition and safe to use year after year. The maintenance plan should encompass all aspects of the kitchen, from the appliances to the surfaces and structural components. Here’s how you can structure a comprehensive maintenance plan:
Daily and Post-Use Maintenance
Cleaning Surfaces:
-
- Wipe down countertops and tables after each use to prevent staining and remove food particles.
- Stainless steel surfaces should be cleaned with appropriate cleaners to avoid corrosion and maintain shine.
Appliance Care:
-
- Grills and cooktops should be cleaned after each use; this includes brushing the grates and cleaning the grease traps to prevent flare-ups and maintain hygiene.
- Refrigerators should be wiped internally and externally to avoid mold and mildew growth.
Utensil and Accessory Care:
-
- Wash all cooking utensils and accessories post-use.
- Store cushions and fabric accessories in a dry area to prevent mildew.
Weekly Maintenance
Deeper Cleaning:
-
- Perform a more thorough cleaning of cooking appliances, including the burners and underneath the hood.
- Scrub grills and cooking surfaces with appropriate degreasers or grill cleaners.
- Check for spider webs, insects, or nests, which are common in outdoor areas.
Monthly Maintenance
Inspection and Cleaning:
-
- Inspect gas connections and hoses for leaks or wear and tear.
- Clear out any blockages in burners or vents.
- Deep clean refrigeration units, inside and out, including seals and gaskets.
- Clean and polish countertops, especially natural stone, to prevent etching and staining.
- Check and clear drainage paths for sinks.
Furniture and Storage:
-
- Clean and condition any wooden features to prevent weathering.
- Lubricate hinges and drawer slides on cabinets to prevent rusting or sticking.
Seasonal Maintenance
Spring/Summer:
-
- Prepare the outdoor kitchen for increased use.
- Check all appliances and perform any necessary repairs.
- Clean and apply sealant to stone and tile surfaces if needed.
- Treat wood surfaces with oil or sealant to protect against the upcoming humid months.
- Ensure all lighting is functioning properly, replacing bulbs as needed.
Fall/Winter:
-
- Winterize the outdoor kitchen in areas where temperatures drop below freezing.
- Shut off and drain water lines to prevent freezing and burst pipes.
- Cover or store appliances and furniture to protect from weather damage.
- Conduct an end-of-season cleaning and inspection to address any issues.
Yearly Maintenance
Structural Inspection:
-
- Inspect the overall structure for any signs of wear, including the foundation and any overhead structures.
- Look for cracks in concrete and repair them to prevent water infiltration and further damage.
Utility Check:
-
- Have a professional inspect gas lines and electrical wiring to ensure they are still up to code and functioning safely.
- Deep clean or possibly replace parts of the grill, like flavorizer bars, igniters, or burners that have deteriorated.
Sealing and Weatherproofing:
-
- Seal stone surfaces to prevent water damage and stains.
- Check and maintain the seal or paint on wood structures.
- Weatherproof any outdoor-rated electronics or speakers.
By adhering to a maintenance schedule, you’ll not only keep your outdoor kitchen looking great and functioning properly, but you’ll also extend the life of your investment and ensure a safe cooking environment. Make sure to adjust your maintenance plan to fit the specific materials and appliances of your outdoor kitchen and the climate you live in.
Throughout this process, keep in mind how the seasons and your entertainment habits might affect the use of your outdoor kitchen. It’s a good idea to consult with an outdoor kitchen designer or landscape architect to ensure that all aspects of the project are covered.
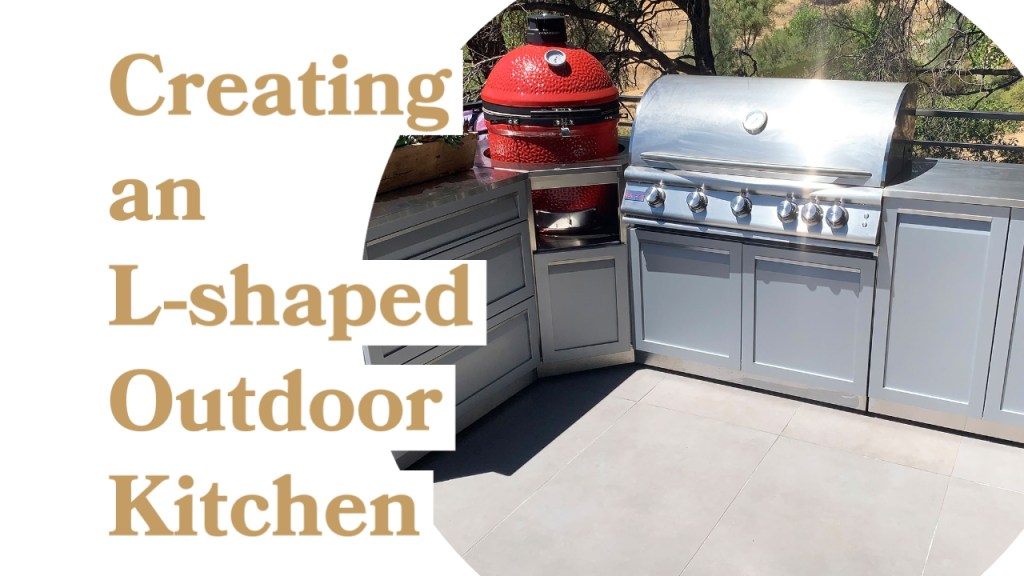
L-Shaped Kitchen Examples:
Below is an L-shaped corner kitchen where both a Kamado grill and Blackstone griddle were incorporated within the design, with a lot of countertop space for easy food preps.

The below homeowners chose to make the most of their deck space available and we helped them design their outdoor kitchen and create an entertainment area they would be proud of. They can move their cabinets around as they are modular and easy to reposition, using the shorter stainless steel countertops covering the individual cabinets.

Here is another fully modular example that shows how all appliances can be incorporated within, easily. A contractor can easily perform the cutouts through a stone countertop.

If you are thinking more along the lines of a permanently anchored outdoor grill island, it could look something like the example below. The grey set corner kitchen is embedded within stone and covered with their choice stone countertop.

Another great design project below shows how minimal stone was incorporated to create a bar and clean side finish. The gray cabinets can appear lighter or darker depending on the lighting how the sun shines on them. The stone bar creates a physical separation and a place to entertain between the pool and grilling area.

For more photos and L-shaped corner kitchen ideas, take a look at the different configurations on our website. Whether you are ready to purchase, need help with visualizing your design or for a simple brainstorming conversation, we are always here to help.
Your 4 Life Outdoor Team
Additional stories:
- The best 36″ – 40″ Built-in Grills for 2023
- Best countertop options
- Side burner within outdoor kitchen cabinets
- Shop outdoor kitchen cabinets
Send us a picture and dimensions of your space to designhelp@4lifeoutdoor.com. We can place the cabinets into the picture for you to see exactly how it would all look!
Any help you need, we’re here to give our expertise.
Looking forward to hearing from you,
4 Life Outdoor team
